12.31.2011

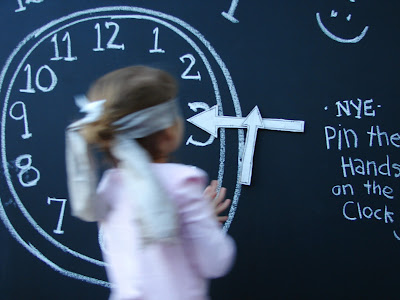
NYE Activity: Pin the Hands on the Clock


We are low-key NYE people but I still like to make things special and fun. I was brainstorming up some ideas to make things more exciting for tonight (to go along with our way cool Times Square ball) and this Pin-the-Hands-on-the-Clock (midnight, of course) idea popped into my head.  

My AMAZINGLY handy hubs made a 4’x6’ outdoor chalkboard wall for the kids over the summer (one day soon I will share my chalkboard obsession with you) so I thought that this would be the perfect spot for our game.  Here’s how I made it:


Step One
Grab some chalk and sketch a handless clock on chalkboard.


Step Two
I recycled some cardboard for the hands. I sketched the hands, cut them out and then applied a coat of white paint (glitter/sparkles would be great, too!) Oh, and used black sharpie for some details.


Step Three
Make a blindfold. I used some scrap fabric.

Step Four
Stick some packing tape on the back of hands and pin away!


**If you don’t have a giant chalkboard, you can always make this using paper or cardboard.  If you use paper, you can always hang it on your refrigerator if you want to get all magnetic. Fun game for ALL ages!  My kids are loving this!!!


I just started my blogging adventure in September and I just want to say welcome to my new friends and THANK YOU for all of your support. I appreciate you and I look forward to sharing fun projects and ideas with you in 2012.  Best wishes for a happy, healthy and exciting New Year!

HAPPY NEW YEAR!

Krista

You can also find this post over @ I {heart} Nap Time & Tatertots and Jello!  ...along with over 1000 other way cool linked up ideas! :)

12.29.2011

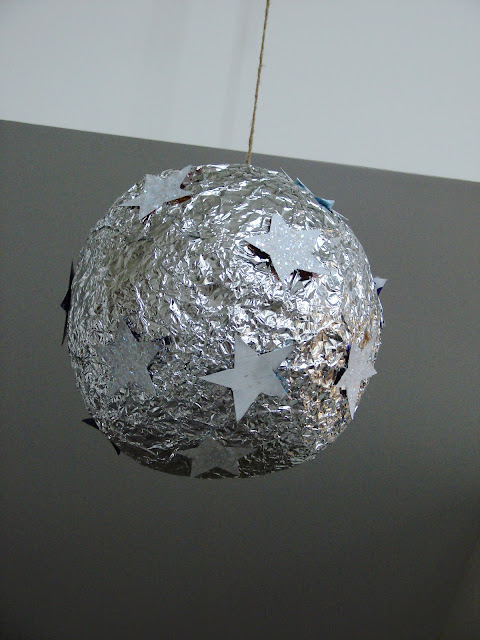
DIY Times Square Ball (pinata)


The kids and I paper mached two oversized punching balloons back in the summer for birthday piñatas.  We ended up not using them for the birthday party…so they have been hanging around in our basement for months (waiting for a coat of paint, glitter, attention…).  I happened to glance over at them yesterday and had a thought… New Year’s Eve Ball!!! Woo Hooo!


We went to town today. Here’s how we made it:

Step One
Paper Mache a punching balloon (ours is about the size of a beach ball…actually, if you have a beach ball laying around that will work too).  Tie string around balloon and hang to dry. You can speed up the drying process with a hair dryer.


Step Two
Cover dried paper mache ball with aluminum foil. We layered the foil to shape it and for sturdiness.  


Step Three
We decided to stick with a metallic look so we painted some cardboard (recycled cereal/cracker boxes) with a coat of white paint. Once the paint dried, we traced our star cookie cutter and cut stars out of the cardboard.  Next, we mod podged the stars and sprinkled some left over glitter snow on them to add some bling.  Gotta bling in the New Year, right?  ;)


Step Four
While the glitter snow dried on the stars, we reinforced the aluminum foil layers with some hot glue.  


Step Five
Add the stars using hot glue.


Taaa daaaaaahhh!


So it might look a little like a middle school space project (don't judge), but that is the fun of it...and it is the start of a new tradition in our house. I already sketched up some ideas for next year.  Go ahead, give it a try...you'll have a ball! :)


*BONUS:  You can turn this into an INCREDIBLY COOL pull string piñata by doing this:  

1. Cut a trap door flap on the bottom of ball.
2. Punch holes and attach pull strings (for # of people participating)
3. Fill ball with confetti (you can just cut tissue paper/paper)
4. Close flap and secure with a layer of foil.
5. TEN, NINE, EIGHT, SEVEN, SIX, FIVE, FOUR,THREE, TWO, ONE… (pull strings…confetti falls)  HAPPY NEW YEAR!!!  YAY!


*For a great step by step tutorial on a pull string piñata…check out this post over at YHL.


You can also find this post over at Whipperberry I {heart} Nap Time and Tatertots & Jello !

12.23.2011

DIY Wrapping Paper


I am not one to buy gift wrap these days. I have more fun with rolls of brown/white craft paper and paper lunch bags. You get more for your buck, you can personalize the package and you can keep things simple or get super creative. I am always excited to see what we come up with.

I kept the kiddos busy (and of course I had to join in on the fun…which turned out to be extremely therapeutic) this morning with a “decorate-it-yourself wrapping-paper-color-fest.”  How do you like that name?  

Here’s how we made it:

Step One:
Roll out a few feet of craft paper.

Step Two:
Collect all of your red and green crayons, markers, colored pencils, etc.


Step Three:
Color, scribble, doodle, all over the paper.  


Step Four:
Wrap. J 

I would love to show you a sample photo of a beautifully wrapped gift – but I am a little behind in that department.  Somebody spent waaaay too much time coloring. Actually, this project took less than 20 minutes. Maybe it was the cookies and milk that side tracked me. Oh well...'tis the season!


Happy Wrapping!

12.14.2011

O Handprint Trees!


Hi, I am Krista and I am a sentimentalist. I tear up just watching my kids play and their conversations with each other melt my heart. They are so incredibly amazing in every way. I keep just about every drawing, painting, rock or stick that they hand me.  Since they are growing so quickly, I try to create projects that capture their growth…so I incorporate handprints often.  We finished little handprint trees today and here is how we made them:


Step 1:
Make ahead Painted Paper:  (see painting tips here)
If I have a project in mind or if a specific holiday is approaching, we have a painting day using colors of the season. Then, as I think of projects or have some type of inspiration to make something, I have fun painted paper at my finger tips (and I don’t have to wait for paper to dry…woo hoo!).  So for this project we used our pre-painted green paper.

Step 2:
Gather materials:
Cardboard cones (or any kind of cone), paper towel roll, painted paper, hot glue, scissors, brown colored pencils and cute little hands to trace.


Step 3:
Trace and cut out hands. Make sure to trace some of the wrist which will be helpful in the next step.


Step 4:
Wrap and glue hands to cone starting at the bottom. The paper will layer nicely if you work your way up from the bottom. If you include the wrist/arm when you trace you will have more cone coverage.


Step 5:
Color bottom portion of paper towel roll with shades of brown for the tree stump and curl up some of the finger tips (branches). Plop the tree on paper towel roll (or not...they look cute without the paper towel roll, too) and that's it!


O handprint trees, O handprint trees…how lovely are your branches!

I know…I am a cheeseball. :)

12 days!


I am sharing this over at Blue Cricket Design, 30 Handmade Days, Whipperberry & Tatertots& Jello!

12.12.2011

Toilet Paper Roll Garland


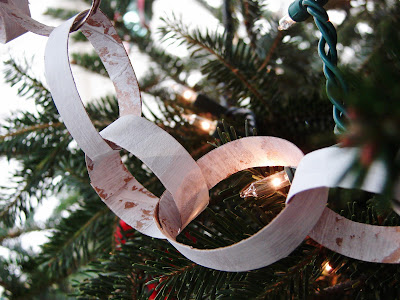
If you have been following along, you know about my toilet paper roll collection. Since our stock was getting a little out of hand…we decided to use them to make mini tp link garlands. Here is how we made them:


STEP 1.
Using  flat white paint (I used gesso), paint toilet paper rolls inside and out. If you want to give it a birch tree bark type of look...brush lightly leaving some of the cardboard color exposed.


STEP 2.
Once the paint is dry, cut tubes into mini rings.


STEP 3.
Snip and hot glue rings together to form a link chain.


There you have it...toilet paper rolls turned elegant. :)
(and I just noticed a smudge on my wall)  


in the tree...


I love the mininess of them and how they kind of look birchy/wintery/snowy.


Time to bake some cookies...I'll let you know how they turn out. :)


*Find this project and incredible creative inspiration over @  Tip Junkie!

12.08.2011

Deck the Halls!

Hi there! We’ve been decking the halls this week with a lot of this:


I love fabric…and when it has polka dots printed on it I love it even more. Here is a simple garland that we made today. It took no time at all and here is how we did it:


1. Gather festive fabric (or felt…or maybe paper! …so many possibilities!)


2. Cut 1 ½ x 6” strips (longer lengths look great, too!)


3. String out some white yarn (or any color)
4. Fold fabric strips in half over yarn and secure the crease with some hot glue. I left a 1/2”ish  space between each.
5. Decorate. J


We also dressed up some old yarn cones that have been hibernating in my box of things to be recycled. We painted the white one with a single coat of white gesso and then polka dotted it using and pencil eraser and red acrylic. The mostly red cone is wrapped in fabric.


and there you have it. :)


I hope that you are enjoying this holiday season!


I'm sharing this over here, here, here ,  here & here. :) 


12.02.2011

Joy!


Joy is such a happy little word.

I made this last year using a small 6x6 canvas, fabric and felt.  I screamed a big "wooo hoooo" and gave it a hug when the kids grabbed it out of the box of decorations. It is one of my favorites! I love to look at it…it makes me happy and joyful.


Speaking of  joy and favorites…if you haven’t already, you have to head over to visit Ashley at Lil Blue Boo. You’ll be glad that you did.

I hope that your holiday season is filled with JOY!

Joy! Joy! Joy!  


{Link up and join the party over @ Tatertots & Jello , 30 Handmade Days, Whipperberry & Tip Junkie!}